Last update: Feb 29, 2024OPTION-2RaspberryPi OS Lite image + dump1090-fa + Radarbox24 data feeder STEP-1: Write Image to microSD cardAlternate-1: Using Raspberry Pi Imager (Recommended)This method has advantage that you can configure user name, user password, Wifi SSID, Wifi Password, and enable SSH in the Raspberry Pi imager, and when the microSD card is inserted in Pi and Pi is powered up, the WiFi and SSH are available right from first boot.
Download Imager from here:
https://www.raspberrypi.com/software/
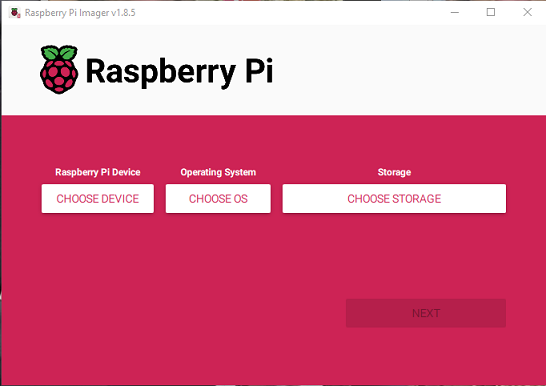
Insert microSD Card in your Desktop/Laptop’s card slot (or use a card reader plugged into USB Port) and follow instructions here:
https://www.raspberrypi.com/documentation/computers/getting-started.html#installing-the-operating-systemAlternate-2: Using Win32DiskImager or BalenaEtcher This option requires that a Monitor, Keyboard and Mouse is connected to RPi on First Boot, in order to configure (a) username (b) user password (c) Wifi SSID (d) WiFi password (e) Enable SSH. (2.1) Download Raspbian
Lite image (zip) on your Desktop/Laptop
Download page:
]https://www.raspberrypi.com/software/operating-systems/]
(2.2) Unzip downloaded file to get
.img file.
(2.3) Insert microSD Card in your Desktop/Laptop’s card slot (or use a card reader plugged into USB Port).
(2.4) Write the unzipped Raspbian Lite image to microSD Card using
Win32DiskImager or
Balena Etcher.
(2.5) Connect a Monitor, Keyboard and Mouse to RPi. (2.6) Remove microSD card from card reader, insert into Pi, power up
The OS will boot, and ask you to enter username (for example pi), and user password.
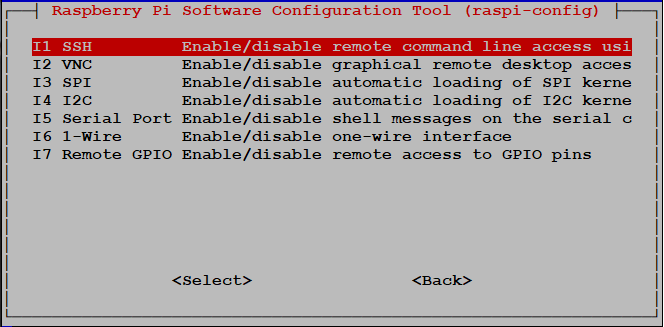
(2.7) Issue following command
sudo raspi-config
Above command will open a dialog box. Follow steps shown in attached screenshots below to (1) Configure WiFi and (2) Enable SSH
Configure WiFi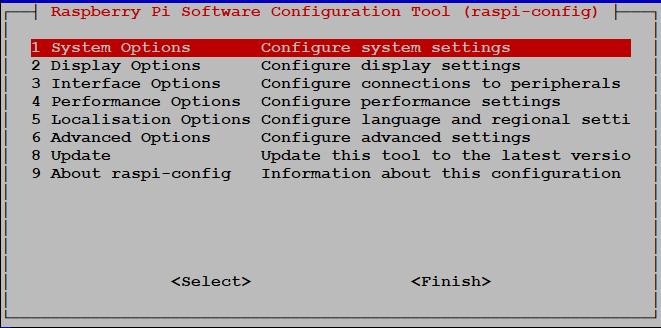
 Enable SSH
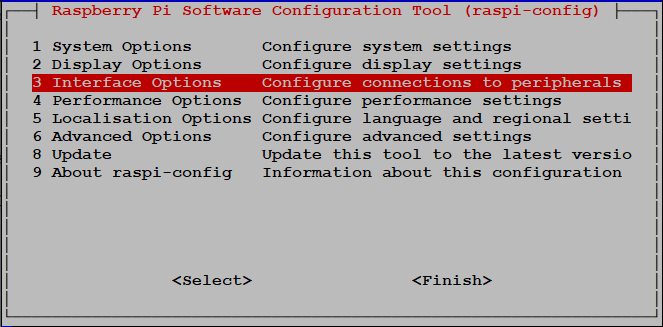
 (6) Install dump1090-fa
- It is important that first dump1090-fa is installed, and data feeders are installed after dump1090-fa has been installed.
- To see the map, type in address bar of your browser:
http://<IP of Pi>/skyaware/
(a) Installation of dump1090-fawget https://www.flightaware.com/adsb/piaware/files/packages/pool/piaware/f/flightaware-apt-repository/flightaware-apt-repository_1.2_all.deb
sudo dpkg -i flightaware-apt-repository_1.2_all.deb
sudo apt-get update
sudo apt-get install dump1090-fa
sudo reboot
To check latest version, please go to item "3 - Download and Install PiAware" on this page:
http://flightaware.com/adsb/piaware/install.
.
(b) Configure dump1090-fa: The following command will open settings file for viewing/editing.
sudo nano /etc/default/dump1090-fa
Receiver Location:To this file, add your receiver's Latitude and longitude (in decimal format) . By default these values are left blank, which I have filled by xx.xxxx and yy.yyyy as shown below.
# Receiver location, used for some types of position decoding. Provide the location as
# signed decimal degrees. If not given here, dump1090 will also try to read a receiver
# location from /var/cache/piaware/location.env (written automatically by PiAware, if installed)
RECEIVER_LAT=xx.xxxx
RECEIVER_LON=yy.yyyy
Gain: The initial gain value by default is set 60 as shown below.
# Initial receiver gain, in dB. If adaptive gain is enabled (see below) the actual gain
# may change over time
RECEIVER_GAIN=60
If you want to change gain setting, replace 60 by the gain value you desire. The possible gain value range is from 0 to 49.6 and 58.6
All gain values should be positiveAdaptive GainBy default Adaptive Gain is enabled.
# Adjust gain to try to achieve optimal dynamic range / noise floor?
ADAPTIVE_DYNAMIC_RANGE=yes
Adaptive gain automatically adjust the gain to value required according to signal strength. It starts with default value 60, tries different values and sets at a value suiting to current sinal level. It repeats this at regular intervals.
If you want to turn-off adaptive Gain Control, change "yes" to "no" as shown below:
# Adjust gain to try to achieve optimal dynamic range / noise floor?
ADAPTIVE_DYNAMIC_RANGE=no
After making changes, save file and exit
#restart dump1090-fa
sudo systemctl restart dump1090-fa
#check status of dump1090-fa
sudo systemctl status dump1090-fa -l
See Map in your browser at following address
http://<IP of Pi>/skyaware/
.
(7) Install Radarbox24 data feeder(a) Install Radarbox24 Feedersudo bash -c "$(wget -O - http://apt.rb24.com/inst_rbfeeder.sh)"
(b) Configure Radarbox FeederAfter installation is complete, the rbfeeder will automatically obtain a feeder-key and station number.
To claim your station and link to your email address, go to:
https://www.radarbox24.com/raspberry-pi/claimYour feeder-key and station numbers are stored in file rbfeeder.ini.
You can check your station number and key by following command
sudo cat /etc/rbfeeder.ini
#above command will display following text
[client]
network_mode = true
log_file = /var/log/rbfeeder.log
key = xxxxxxxxxxxxxxxxxxxxxxxxxxxxxxxxx
sn = EXTRPIxxxxxx
[network]
mode = beast
external_port = 30005
external_host = 127.0.0.1
[mlat]
If you already have a feeder key, you can set it by following commands
sudo rbfeeder --no-start --setkey ‹your sharing key›

sudo systemctl restart rbfeeder

#check what key has been set
sudo rbfeeder --showkey --no-start

#check status
sudo systemctl status rbfeeder -l
(8) ADD TERRAIN LIMIT RINGSDump1090-fa can display terrain limit rings using data obtained from the website
http://www.heywhatsthat.com.
(a) First you have to generate a panorama for your location. To do this, follow the steps in the
first post of the following thread:
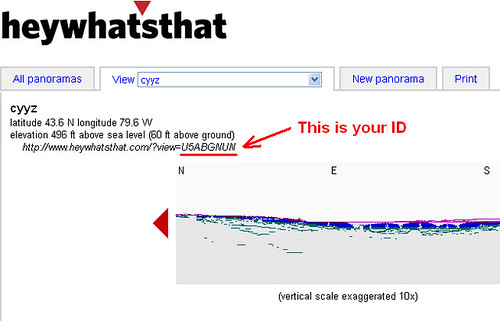
What is the Maximum Range I can Get?(b) Once your panorama is generated, look near the top left of your newly created panorama page. You will see URL of your panorama there. The URL will be
http: // www . heywhatsthat . com/?view=XXXXXXXX where XXXXXXXX is the ID for your panorama.
See screenshot below.
(c) Use following command to download the generated panorama's JSON file "upintheair.json" to your RPi, and save it in the folder "/usr/share/skyaware/html" (replace
XXXXXXXX in the command below by your panorama's ID).
[/list]
sudo wget -O /usr/share/skyaware/html/upintheair.json "http://www.heywhatsthat.com/api/upintheair.json?id=XXXXXXXX&refraction=0.25&alts=12192"
You can create as many rings as you want by adding elevations (in
meters) at the end of URL given in the wget command above after "&alts=", separated by commas.
10,000 ft = 3048 m
20,000 ft = 6096 m
25,000 ft = 7620 m
30,000 ft = 9144 m
40,000 ft = 12192 m
Hence if you want to add all the 5 elevation rings noted above, the string at the end of wget URL will become "&alts=3048,6096,7620,9144,12192"
NOTE: To keep map un-cluttered, I have used only 1 ring in the wget command above. i.e. the 40,000 feet (12192 meters).Important: Use altitude in
meters in the wget URL above.
Do NOT use feet.
(d) RESTART dump1090-fa
sudo systemctl restart dump1090-fa
Reload your browser (Ctrl+F5). If terrain rings do not appear, clear browser cache (Ctrl+Shift+Delete)

